Hot Lips Salvia
Hot Lips salvia earns attention with small red-and-white flowers that seem to float above its foliage. The pattern can change with temperature: some blooms look almost entirely red or white, while others show the familiar two-tone combination. That variation is part of the plant’s charm, not necessarily a sign that anything is wrong.
Where to plant it
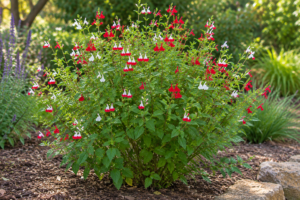 Choose a sunny place with at least six hours of direct light when possible. A bed beside a walkway, a sunny border, or a large patio container can work well. Hummingbirds and other pollinators appreciate the flowers, and the small leaves provide a softer texture alongside larger plants.
Good drainage matters as much as sunlight. In heavy North Texas clay, avoid a low spot that stays wet after a storm. Plant in a gently raised, broadly prepared bed or in a pot with drainage holes. Do not put gravel in the bottom of the pot as a substitute for drainage. Give the plant room for air to move around it; check your particular plant’s mature size before spacing it.
Watering and seasonal care
Water a new plant thoroughly, then check the root ball regularly while it becomes established. When the upper inch or two of soil begins to dry, water deeply enough to moisten the roots. Once established, Hot Lips generally handles short dry periods better than constantly wet soil. Containers dry more quickly, especially in July and August, so check them often rather than following a fixed calendar.
A light trim after a major flowering flush can encourage a neater shape. In late winter or early spring, remove dead stems after the worst cold has passed and you can see where new growth is emerging. A severe freeze can damage growth, and plants in pots are more exposed than those in the ground. Avoid heavy fertilizer: lush growth at the expense of flowers can be disappointing.
Make new plants from cuttings
Take cuttings from a healthy, actively growing plant in spring or early fall, when the parent is not stressed by heat or drought. Choose a nonflowering tip about three to four inches long and cut just below a node, the point where leaves attach. Remove the lowest leaves and any flower buds; leave a small set of healthy leaves at the top.
Insert the lower node into a premoistened mix of equal parts coir or peat and perlite. Make a hole first so the cutting is not scraped as it goes in. A rooting product labeled for the plant is optional; follow its label and avoid assuming a stronger product works better. Firm the medium gently.
Set the pot in bright, indirect light. A loose clear cover can slow moisture loss, but keep the leaves from touching the plastic and ventilate if heavy condensation or mold develops. The mix should feel moist, never soggy. Rooting often takes several weeks and may take longer in cool conditions. A gentle tug that meets resistance, followed by visible roots at a drainage hole, suggests progress.
Once roots hold the mix together, move the plant into a small pot of well-drained potting mix. Gradually increase air exposure and, later, introduce outdoor sun over a week or more. If your cuttings wilt immediately, reduce leaf area and improve humidity; if stems turn black, check for excess water and discard rotting material.
Learn more: NC State Extension: Salvia microphylla and Texas A&M: Propagating foliage and flowering plants.